|
Home
Why?
What?
How?
Tender
Cettia
Articles
Poems
Links
Contact
|
|||
 |
Of Camber, Carlins, Coamings & Coachroofs
In this section the carlins are added to the bulkheads and the hatch openings are inserted. The decking is added and
hatches are also built. A couple of dorade vents are built and added.
First though, there is too much
camber where the forward solar panels need to go!
|
||
|
The carlins are fore-aft timbers that support the deck - i.e. stringers for a horizontal surface. Before they can be added to the notches already cut in the bulkheads, the camber on bulkheads No. 2 and No. 3 needs to be reduced. The plans specified camber up to 75mm over the width of these bulkheads and, without thinking about it too much, this is what I did. Unfortunately, a semi-flexible solar panel needs to be glued to this section of the deck and the maximum camber allowed for the panel I had in mind was only 20mm over a width of 800mm. Ooops! A bit of reverse engineering had to be practiced. In this photo one can see the different colour wood on top of Bulkheads 2 & 3, where the bulkheads have been augmented, thus reducing the camber. Carlins to support the starboard foredeck are in place. Top of Page 
Bow carlins are now finished. Note how the central hull section only has carlins from the gunwale to the centre line; This is because the inboard areas of each hull, and the space between the hulls, will be covered by the bridgedeck coachroof. Top of Page 
After much debate the position of the forward hatch and solar panel is now decided. The hatch openings are 520mm square. Once the hatches are installed the opening will be 500mm square, which is comfortably wide enough for an adult to clamber in and out of. The panel is a 70W semi-flexible panel, of dimensions 800 by 700mm, made by GB-Sol. Top of Page 
To work on the cabin topsides necessitated moving one hull towards the centre of the polytunnel. The hulls are now very heavy so I had no idea how difficult this would be. Two lifting bars were used to lever up one side of the frame so that a scaffolding pole (shown between me and the hull) could be inserted underneath. The same thing was then done to the other side. It was then easy to roll the hull sideways. Top of Page 
Aft and side decks have now been done. The daubs of resin show where the screw holes have been filled with thickened epoxy. The tricky bit with the sidedecks is cutting out the hole for the daggerboard cases; a profiling guage was used to transfer the shape of the case onto the deck. The top of the case will be trimmed flush with the deck later. Top of Page 
Here is Mac, dressed for work. A good set of knee pads are essential for moving around on deck or inside the hulls where there is no headroom - mine are so comfortable I
am happier on my knees than my own two feet! A good respirator speaks for itself - Mac's is a bit over the top, but then he did serve in the trenches ...
The shower cap is a recent innovation: when working inside the hull, epoxying tape into place on the undersides of decking still wet with epoxy, it is difficult to avoid getting
epoxy in one's hair; removing it is a very painful experience which leaves bald patches. When one's hair is not as thick as it used to be, more bald patches are not a good
thing!
Top of Page 
Here is Jules, my future son-in-law, applying resin to the 300 g/sq m biaxial cloth covering the port aft deck. Top of Page 
Routing a rubbing strake. Long pieces of 2" by 1" PSE Iroko were scarfed together to give one rubbing strake over 30 feet long. The router, in a table, was used to round-off the outside edges. Feather boards were used to keep the timber firmly on the table and up against the fence; this ensured a consistent profile as well as protecting Owen's hands. The dust extractor's hose is clamped onto the fence to remove the shavings. Top of Page 
Because of the curve, I couldn't work out how to do a jig for the fore hatches. So, the multitool was used to trim the coaming to the same height as the bottom of the hatch rebate. If I had not trimmed off enough, I sanded down to the rebate, if too much (and I did both!), then I need to build up with epoxy filler. Building these hatches is proving a time consuming business. Top of Page 
This aft hatch is almost finished. The hinges have been bolted to the deck through a gasket of polysulphide sealant, the 6mm polycarbonate lens is in place (screwed to the hatch through a silicone gasket), a closed cell neoprene seal has been stuck to the bottom edge of the hatch using waterproof contact adhesive (and another to the lens), chrome stays and catches have been fitted. For more details see construction_details.pdf. The solar panels have been fitted, one on the foredeck and one on the aft deck of each hull. These have also been bedded down with polysulphide sealant. The cable from the panel has been passed through the deck in a waterproof cable gland, which is itself bedded down with (you guessed it) polysulphide sealant. The cable glands were obtained from my panel supplier - details are available here. The decks have now been sanded, faired and painted. A non-toxic, VOC-free, exterior, latex paint has been used - an interior version of the same paint was used inside the hulls. The details of the paint can be seen at www.mythicpaint.co.uk. A non-slip paint will be added later. Top of Page 

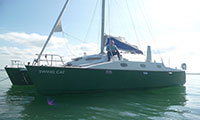
Several months later: the hulls have been joined together and stanchions and lifelines added. The stanchions are deck fittings and the methodology used to fix them to the deck is described in construction_details.pdf. The lifelines are 5mm 1x19 stainless steel wire rope. Wire rope with a PVC coating could have been used but was rejected since stainless steel needs to be exposed to the air if it is to retain its passivating layer. Top of Page 
However, the Wire Rope Shopsells swageless terminals much more cheaply. These simple forks were only about £5 compared with about £40 from Sta-Lok. Top of Page 
|

There is no camber on the aft decks, so the same problem does not arise. The tricky aspect here is the transition from the side decks, over the central hull areas (which will house the galley in the starboard hull and the heads in the port hull) to the aft decks over the double cabins. Top of Page 
Stern carlins are now finished. Top of Page 
After much debate the position of the aft hatch and solar panel is now decided. There is still room for a comfortable steering position
to be constructed on the deck as well as the panel and hatch. One of the advantages of catamarans is that they have a lot of deck
space. There is also room to walk around the panel without stepping on it. The panel can be walked on, but I feel happier
if I can site it in an area which does not get heavy foot fall.
Top of Page 
No decks were added over the fore and aft cabins until the fitting out was nearly finished. All cabins were fully wired, insulated and painted. The aft decks were done first since, being one large flat area, they are easier to do than the foredecks. This deck is too big to cover with one sheet of ply. The plans call for ply sheets to be butt jointed, reinforced with 3 overlapping strips of glass; instead, I have gone for a longitudinal scarf joint, the longest I have cut to date. The joint is also positioned so I can clamp it to a carlin with a screw through the middle of the joint. Top of Page 
First foredeck. Note the camber on the big sheet of plywood. Keeping this sheet over wide helps with bending it to fit - it will be trimmed to the shape of the hull once the epoxy has cured. I was very glad to have Richard to help me - it was definitely a two-person job. The sturdy steps took a day's effort to build but make working on the bow so much easier. Inside the hull, the decking/gunwale and the decking/bulkhead joints are reinforced with 600gm/sq m tape, wetted out with epoxy. The hatch opening in the plywood is flush with the carlins which create the hatch opening. Top of Page 
Here is the coaming for the forward hatch. A coaming is a vertical surface on a boat designed to prevent, or deflect, ingress of water. Our hatch coamings consist of 2 pieces of 9mm plywood: the first is epoxied and screwed to the vertical surface of the hatch opening; the second is epoxied to the outside of the first and to the deck. A fillet of thickened epoxy protects the coaming/deck joint. Why make my own hatches, when they can be picked up cheaply on eBay? Because I like the look of wooden hatches and want hatches which mirror the curves of the deck. Top of Page 
Richard doing some tailoring. This is the last bit of glass for the hulls. The glass is an E-Glass 45 degree double bias stitched fabric. This means it has half of its fibres at 45 degrees to the length of the cloth and the other half at right-angles to the first lot. In the US, this cloth is also called biaxial. The advantages of this cloth is that it adds strength to a substrate where the loads can come from different directions. Here are the available fabrics from my supplier. Top of Page 
The bottom of the hatch lid is to sit flush with the deck. In the top of the hatch lid is a rebate in which the hatch lens will be fixed. The bottom of the rebate is flush
with the top of the coaming, so that the lens is in contact with both hatch lid and coaming. I will then install double seals: one between the deck and the hatch lid and the
other between the lens and the coaming. This photograph shows a router jig used to cut the rebate and trim the coaming to exactly the same height in one operation.
Top of Page 
The rubbing strake is screwed to the gunwale. The screws are recessed into the Iroko wood with the screw holes plugged with tapered plugs. The plugs are cut from
the same wood using a tapered plug cutter. The taper ensures a tight fit. In this photo you can see the plugs protruding above the surface. They will
shortly be sawn off and sanded flush.
The finished fore hatch. The seals and silicone sealant have been covered with primer and deck paint to provide UV protection. The decks have now been painted with a
non-slip paint - Safecote from
New Venture Products.
Top of Page 
Top of Page 
Two vents are put in the decks. On the port hull is a vent for the composting lavatory; on the staboard hull is a vent for ventilation. Both vents are dorade vents. For the principles behind dorade vents and the details of their construction see construction_details.pdf. Top of Page 
All lifelines are fitted with pelican hooks for quick release. These are swageless fittings from Sta-Lok. "Swageless" means a fitting which can be assembled using spanners rather than requiring expensive swaging or crimping tools. However, the Sta-Lok swageless terminals are expensive - each Pelican Hook cost over £44. Top of Page 
Richard has installed the autopilot. The end of the piston goes to a lug bolted to the underneath of the tiller. The autopilot has to act on the tiller the given distance away from the rudder post so that it can steer the boat through a large angle; if it was attached to the end of the tiller only small corrections to the course could be made. The cable goes though a deck gland for connection to the NMEA bus and a 12V supply. Top of Page |
||